Final Cut Pro X is a professional video editing software from Apple meant to work with the new Mac Pro. It offers excellent media organization and quick access and revolutionary editing tools all in a single program. You can easily import a variety of media from video files, to audios, to pictures, organize them, and then access them within seconds. Below is an easy-to-follow tutorial on importing different types of media into Final Cut Pro X.
Part1. Import Video Files to FCP X Part2. Import Audio Files to FCP X
Part3. Import Image Files to FCP X
To make movies in Final Cut Pro X, you should first transfer the movies from different sources to FCP X. As FCP X is primarily designed to import videos from different devices, you can easily:
#1. Import videos from tape-based camcorders
#2. Import videos from file-based (SD/CF card-based) camcorders
#3. Import videos from camera archive or disk image
#4. Import videos from local disk
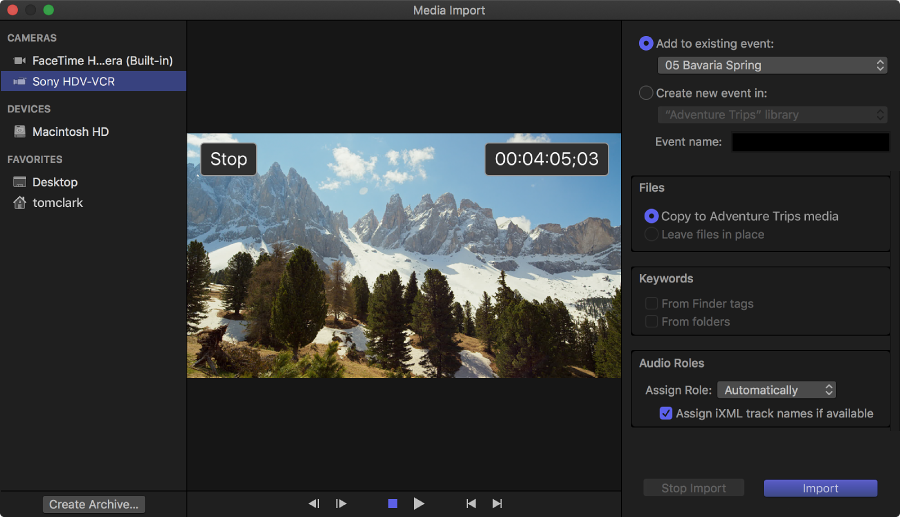
Step 1: Using the cable that came with it, connect your camcorder to your computer. Configure the device for remote control over FireWire.
Step 2: Turn on your camcorder and set it to either "VCR" or "VTR" mode.
Step 3: In Final Cut Pro click the Import Media button on the left side of the tool bar OR click "Choose File>Import > Media".
Step 4: Choose the camcorder you are importing from for the list of devices on the left.
Step 5: You can set the tape where you want to begin the upload using the playback controls. You can also skim over the media by moving the pointer forward or back over the filmstrip. When you have settled on the clip you want click Import.
Step 6: Choose how to organize your media in the window that appears. You can choose "Create new event in", choose the library for your file from the pop-up menu, then add the name in the text field. To add your file to an existing file, choose "Add to existing event", and just choose that file from the pop-up menu.
Step 7: If you wish to analyze your video choose the relevant checkboxes in Transcoding, Keywords, Audio, and Video sections. If you don't choose to analyze your media during the import process, you can always analyze it later in the browser.
Step 8: Click "Import". The video will play as it's being imported.
Step 9: Once the video you wanted to import is finished, click "Stop Import" or press "Escape".

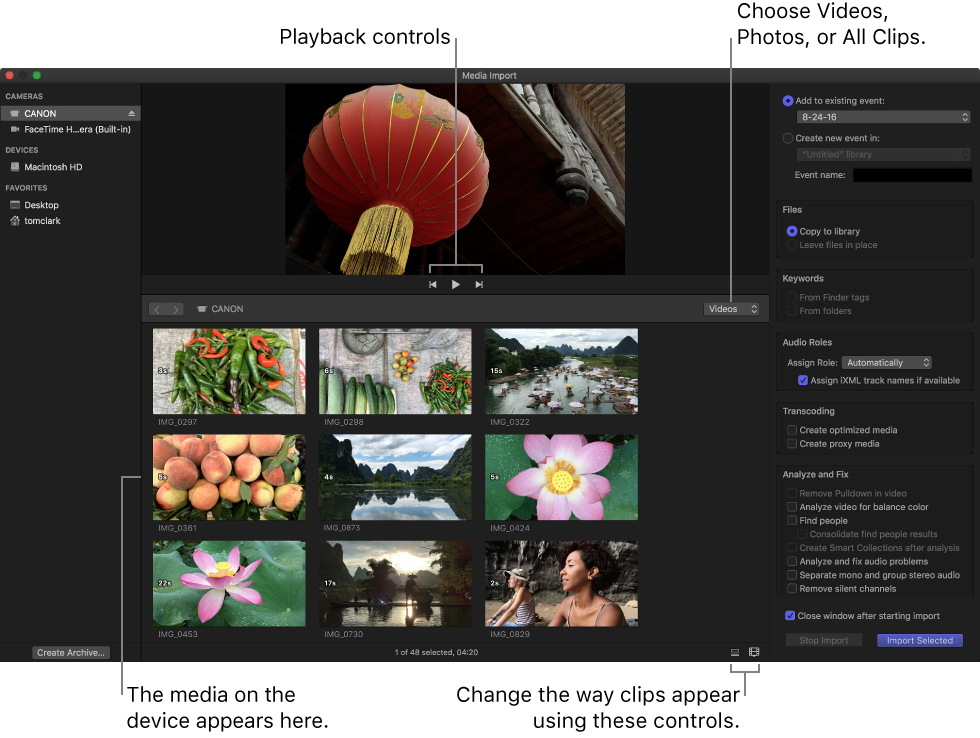
Step 1: Using the cable that came with it, connect your camcorder to your computer. Configure the device for remote control over FireWire.
Step 2: Click the Import Media button on the left of the tool bar OR click "Choose File > Import > Media".
Step 3: Select your device from the section on the left.
Step 4: Select the clips you wish to import. You can switch back and forth between "List View" and "Filmstrip View".
Step 5: If importing all of the clips from your camcorder or card, click "Import All". You can select specific clips by Command-clicking each clip and then click "Import Selected".
Step 6: You can choose how to organize your media. Choose the "Create new event" from the pop-up menu then type the name into the text field. You can save clips to existing files by clicking "Add to existing event" in the pop-up menu and select the event.
Step 7: Click "Import".
1) How to create a camera archive or disk image:
Step 1: To create an archive of your media, connect your device to your Mac. If you're using a camcorder set it to PC mode.
Step 2: Click Import Media on the left-hand side of the toolbar OR click "Choose File > Import > Media".
Step 3: Select your device from the left side of the window then click "Create Archive" button on the bottom of the window.
Step 4: Type the name of your file into the "Create Camera Archive as" field then select a location in the "Destination" pop-up menu. Click "OK". The camera archive will be stored on your hard drive.
2) How to Import media from a camera archive or disk image:
Step 1: Click the Import Media button on the left-hand side of the toolbar OR click "Choose File > Import > Media".
Step 2: Select the device you wish to import the media from disk, memory card, or external hard drive. Double-click the archive to open a list of archived clips.
Step 3: Select the clips you wish to upload then organize them. Click the "Create new event" from the pop-up menu then type the name into the text field. You can save clips to existing files by clicking "Add to existing event" in the pop-up menu and select the event.
Step 4: Click "Import".
Important: Backing up Your Archive
It is important to back up your archive to an external hard drive or disk. You should always keep multiple back-ups of all files and folders. When creating your archive, you can hook up an external hard drive and save it at the same time you create your archive. It is also important that you store your archive on a separate partition from your Final Cut Pro media files to protect them until you are ready to upload them. You can also save your files and folders to iCloud.
Not all of the video you want is stored on a camcorder. You may have some copy clips on your Mac. Before you import these video files to FCP X, you should check whether they're supported by FCP X first:
| Supported Codecs | Apple Animation codec, Apple Intermediate codec, Apple ProRes (all versions), AVC-intra, AVCHD (including AVCCAM, AVCHD Lite, and NXCAM), DV (including DVCAM, DVCPRO, and DVCPRO50), DVCPRO HD, H.264, HDV, iFrame, Motion JPEG (OpenDML only), MPEG IMX(D-10), REDCODE RAW (R3D), Uncompressed 10-bit 4:2:2, Uncompressed 8-bit 4:2:2, XAVC, XDCAM HD/EX/HD422, QuickTime formats. |
| Note: Even though FCP X supports these formats, it is not always the case when you try to import them to the application. To solve the problem, just convert the file to FCP X compatible formats using the method mentioned below. | |
| Not Supported Codecs | WMV, RM, MKV, MPG, etc |
If the file format is compatible with FCP X, you can simply click click "Choose File > Import > Media" to import them.
If you are using an unsupported video format and want to use Final Cut Pro, you have to convert them to FCP X compatible formats before importing. Here an all-in-one FCP X converter: Firecoresoft Video Converter for Mac is highly recommended. It easily converts any and all video formats to FCP X with no quality loss. Once you have converted your files, simply follow the steps above to import them into you Final Cut Pro program.
![]() Secure Download
Secure Download
![]() Secure Download
Secure Download
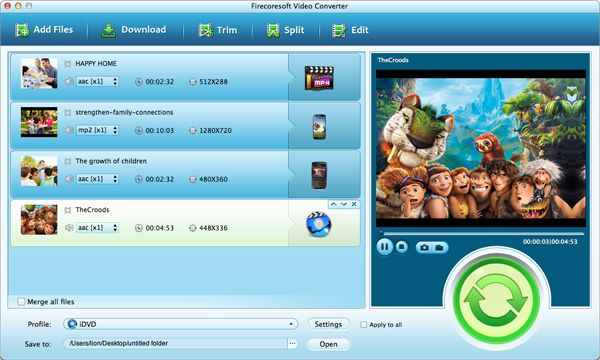
Step 1: Import your file to Firecoresoft Video Converter for Mac by clicking on the "Add Files" button and selecting the files to convert OR drag and drop the files directly into the program.
Step 2: Click the "Profile" menu bar to set the output format. Here, convert to "ProRes 422(*.mov)" is highly recommended. You can also press "Settings" button to customize the parameters of your converted file.
Step 3: After setting the output format, click the "Save To" button to choose the location for your new file.
Step 4: Click the "Start" button to begin the conversion. Once the conversion is complete you can edit the new file or simply follow the steps above to import it into Final Cut Pro X.
Importing audio files an easy process. Whether they're from iTunes, Sound Cloud, or elsewhere, the process is the same:
Step 1: Select "New Event" and name the file in the text field or choose the existing event you want to save the files to.
Step 2: Either right-click the event and select "Import Files" or click "Choose File > Import > Files".
Step 3: Select the files you want to import.
Step 4: Select "Import".
Audio files can also be easily added to and synced with existing video files in Final Cut Pro X. To sync clips automatically:
Step 1: Select the clips you want to use from the Browser.
Step 2: Either click "Choose Clip > Synchronize Clips" OR Control-click the clips you want to use then choose Synchronize Clips from the shortcut menu.
Step 3: Enter a name in the "Synchronized Clip Name" text field.
Step 4: To choose the event you want to add the new synchronized clip to, use the "In Event" pop-up menu.
Step 5: You can use audio waveform data to make precision adjustments, just click on "Use audio for synchronization".
Step 6: You can customize settings by selecting the "Use Custom Settings" button. When the box opens, you can select "Automatic", which syncs clips automatically, "Timecode", for when your clips are pre-recorded with a time code, or "Content Created", which can sync your clips to within a one-second accuracy of your video.
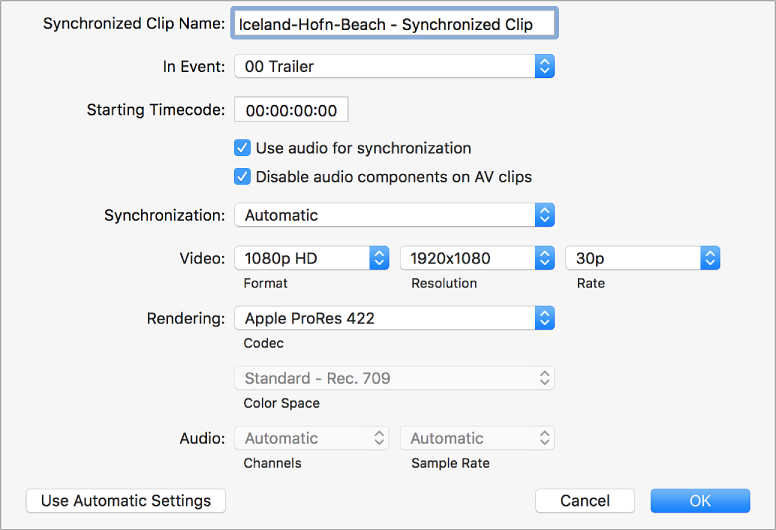
Step 7: Click "OK" and Final Cut Pro will create your new synchronized clip.
You can manually sync you video and audio clips, as well:
Step 1: Select the clip from the Browser.
Step 2: Select "Choose Clip > Open" in Timeline OR Control-click the synced clip you want to change and choose "Open" in Timeline from the shortcut menu.
Step 3: Make adjustments to the clip by dragging the clips left or right to change the points at which the clips connect to each other.
Step 4: When you have finished making changes, click the left-hand arrow in the upper left corner of the Timeline to save the changes and close the window.
To import still images and photos into Final Cut Pro X follow the steps below:
Step 1: Make sure the images (format) you wish to import are supported.
Step 2: Minimize the image size because a large image will take time to load into the display browser. You can do this by using an external graphics program.
Step 3: In the Final Cut Pro X menu, click on "File > Import > Files".
Step 4: With the box open the folder where your images are kept. Double-click on the files you want to import.
Step 5: To set the properties of the images, go to the File menu and select "Show Info". Adjust the duration of the clip. Final Cut Pro has a default of two minutes of identical image frames which you can adjust to as low as ten seconds.
Step 6: Once the preferences have been set simply drag the images into the project viewer and they are automatically imported.
If you want to import still images from a file-based camcorder, you can:
Step 1: Attach the camcorder to your Mac or insert memory card into slot.
Step 2: Click "Import Media" on left side of toolbar OR select "File > Import > Media".
Step 3: Select your device on the left side of the dialogue box.
Step 4: You can select the "Clip Appearance" button to change the way the clips appear in the program.
Step 5: To import all images, click "Import All". To import select images, Command-click each image and select "Import Selected". You can also drag selected clips to enclose them in the selection rectangle.
Step 6: You can also import portions of an image by dragging inside the filmstrip clip, selecting the area you want, then click "Import Selected".
Step 7: You can organize your images by selecting "Create New Event" and adding a file name in the text field, or choose "Add to Existing Event" and choose the location from the pop-up menu.
Step 8: Click "Import".


Browser compatibility : IE/Firefox/Chrome/Opera/Safari/Maxthon/Netscape
Copyright © 2014 Firecoresoft Studio All Rights Reserved