The public passion for Samsung Galaxy Note 3 heats up day after day. The Note 3 has got a 13-megapixel camera with improved flash, capable of taking extreme sharp photos. Another biggest selling point lies in the internal storage. Provided both 32GB and 64GB internal storage options as well as a microSD expansion slot that will support up to 64GB microSD cards, this is really a huge step in the right direction made by Samsung, since many users cried on the pathetic 16GB of internal storage before. Enlarging internal storage means more apps and media data such as photos, music, videos, messages, etc can be saved.
As is often the case, catastrophic data loss or deletion happens, such as unintentionally deleting photos from the Galaxy Note 3 internal memory/SD card. When you are in such face-palm moment, never get tensed since those deleted photos are not at all beyond recovery. Frankly speaking, we can resort to a piece of professional photo recovery for Mac and then recover deleted photos from Galaxy Note 3 on Mac easily. By "professional", we specially recommend Firecoresoft Dr. Sospito--data recovery for Mac (data recovery for Windows). It is specially designed to retrieve deleted photos, documents, messages, emails, and other regular types of data from smart phones, digital cameras/camcorders, USB drives and other external storage devices, etc.
The demonstration of how to recover deleted photos from Galaxy Note 3 on Mac will be broken down into five steps, kindly refer to the below:
![]() Secure Download
Secure Download
![]() Secure Download
Secure Download
First of all, please download the photo recovery for Mac, set it up to your desktop, after that, launch the program. Then, connect your Galaxy Note 3 to the computer, or you can take out the memory card and have it connected to your Mac with a card reader.
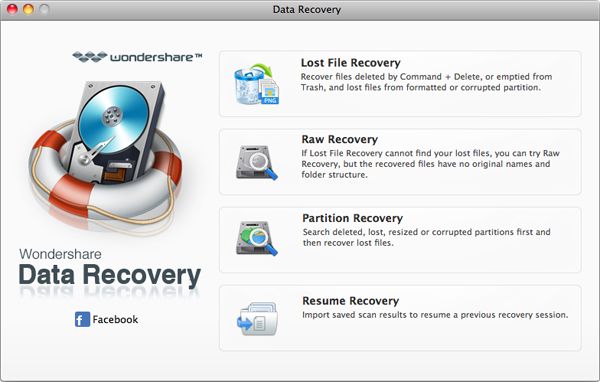
After running the program, you will see its interface with four recovery modes including "Lost File Recovery", "Raw Recovery", "Partition Recovery" and "Resume Recovery". You can choose any one of them based on your data loss scenario. This time, we would like to recover deleted photos from Galaxy Note 3, hence, we should select the first one "Lost Data Recovery" mode. By the way, if this mode fails to find the deleted photos, you can try the "Raw Recovery" mode instead.
After clicking the recovery mode you chose, a new small window will appear, showing you all the drives installed on your Mac. You need to choose your Galaxy Note 3 (or the drive which represents the Note 3 memory card), and then click on "Scan" button to let the scanning started. As the scanning is in process, a progress bar will show the scanning condition synchronously. Note that you can pause or discontinue the scanning if necessary. Final notes on the scanned files: you can save them for later scanning by clicking the "Save Scan Info" button.
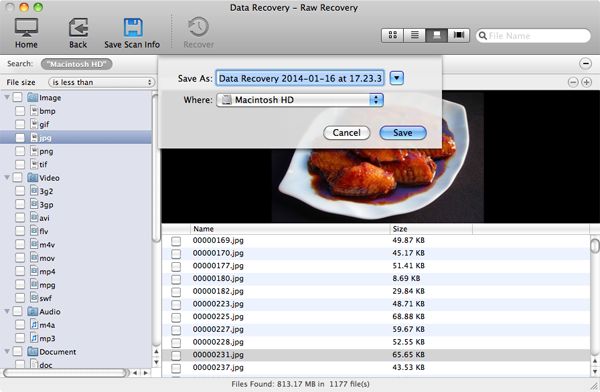
When the scanning process completes, all recoverable files will be displayed with names, size and date in the interface. You are allowed to preview the photos by hitting any one of them.
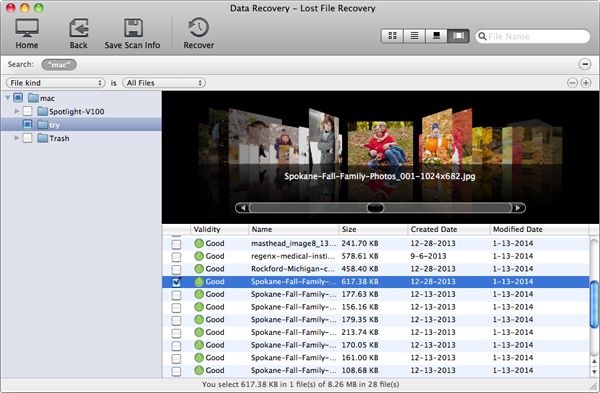
Finally, tick the check boxes of all images, or you can tick the "Image" column on the left of the panel, and then hit the "Recovery" button. Soon afterwards, you will see a small window which allows you to assign the location for saving the recovered photos. Please keep in mind that, never save the deleted photos back to the memory card of your Galaxy Note 3. For reference, you can save them in a file folder created on the desktop. After that, click the "OK" button. The photo recovery for Mac program will begin to retrieve deleted photos automatically.


Browser compatibility : IE/Firefox/Chrome/Opera/Safari/Maxthon/Netscape
Copyright © 2014 Firecoresoft Studio All Rights Reserved