Nowaways, taking photos with a camera is quite common. We photograph lots of things such as people, animals, landscape, activities, etc. We cherish our "masterpieces" a lot. However, we will make mistakes or do stupid things sometimes just like this guy Jackson: "I used the Canon EOS digital camera to take many photos when travelling in the South Africa. To my sadness, when I was viewing the photos, my stupid finger hit the "format" button by mistake. So, all the photos disappeared...". Oh, poor Jackson. Isn't it a great pity that all the memories of South Africa were gone? Is there any possible way to get back photos from camera which have been formatted?
Actually, "how to recover accidentally formatted or deleted photos from camera" is an experience that not rare to most users. No one is happy about such things since you know, there is no default Recycle Bin in a camera, which means, we can never get back photos deleted/formatted from the camera as we do in the computer. However, the good news is that, we can conduct photo data recovery from camera by using the third-party software called Firecoresoft Dr. Sospito -- the most powerful data recovery (data recovery for Mac) software. It is a professional yet easy-to-use program that helps to recover deleted photos from camera such as Canon EOS, Fujifilm Finepix, Nikon Coolpix, Kodak, Panasonic, Samsung and more.
Here are the guidelines on how to recover deleted photos from camera on Windows platform. Please note that the guidelines apply to the Mac as well.
![]() Secure Download
Secure Download
![]() Secure Download
Secure Download
First off, connect your camera to the computer. Or, you can take out the memory card from camera and put it into the computer card reader or use an external USB card reader. Then, download Firecoresoft Photo Data Recovery software, install it in the computer and run it.
On the interface, there are four recovery modes for choices. Basically speaking, to revert lost data due to accidentally deleted by "Shift + Delete" command, formatted or emptied from the Recycle Bin from the computer or other removable storages, "Lost Data Recovery" can be the first choice.
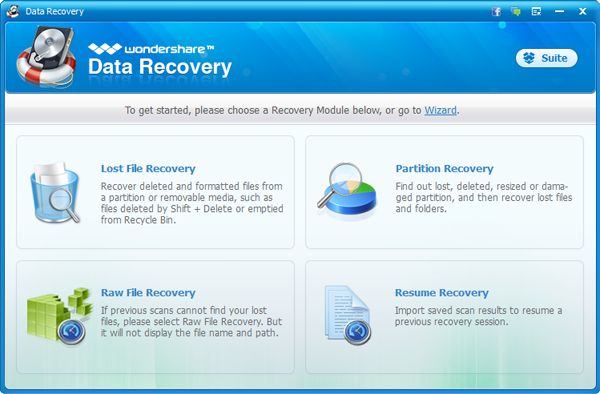
Once you have chosen the recovery mode, you will be guided to another interface, where you can see a list of all the devices installed on the computer. Then, you need to select camera memory card's drive (tips: usually assigned as G: or H:). Click the memory card disk and then press the "Search" button to launch the scanning process. By the way, you can pause or stop the scanning if needed. Besides, by clicking "Save Scan Info" button, you are able to save the previously scanned out results for later recovery.
While the scanning is going on, it will show you a list of the photo files deleted from the camera memory card. You can choose any one of them to preview, confirming if it is the one that you would like to recover. Please note that some files are unreadable and you cannot view them.
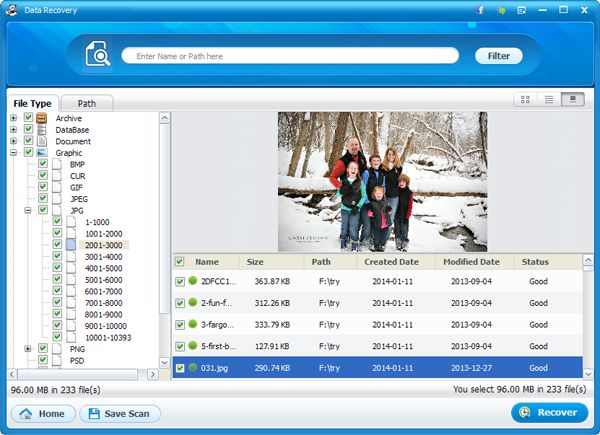
After the scanning has been done, you can select the files that you want to restores, then press the "Recovery" button on the tool bar. You also need to designate a position to save the recovered files, for example, you can create a new file folder on the computer desktop or disk. As soon as the saving path has been set, the camera photo data recovery program will begin the rescue job immediately. By and large, the recovery time is based on the files size and your computer configuration. When finished, you can click open the folder, you will see the deleted photos listing there. Cheers!


Browser compatibility : IE/Firefox/Chrome/Opera/Safari/Maxthon/Netscape
Copyright © 2014 Firecoresoft Studio All Rights Reserved