Last month, my family went to Hawaii for a journey. Although we didn't stay there for very long, it was quite a moment in my life. We have taken many photos with the newly-bought Galaxy S4. After coming back home, my mother couldn't wait to view the photos. She laughed heartily when watching. It seemed that all of our experiences in Hawaii have been put on a big screen. However, so excited she was that she pressed the "delete" button without notice and the photos were gone!
What should we do? Is there a way to recover deleted photos from mobile phone? I decided to search the internet. To my surprise, I found that many people out there have got the same/similar problems as I did. There were also many solutions on how to get back photos from mobile phone with various professional mobile phone photo data recovery software. After comparison, I decided to try the one called Firecoresoft Dr. Sospito -- data recovery software for Windows (data recovery for Mac). It is said to be able to get back photos from mobile phone without any damages. I had thought that it would be very difficult to use this smart program, but I proved to be wrong after the first successful trial.
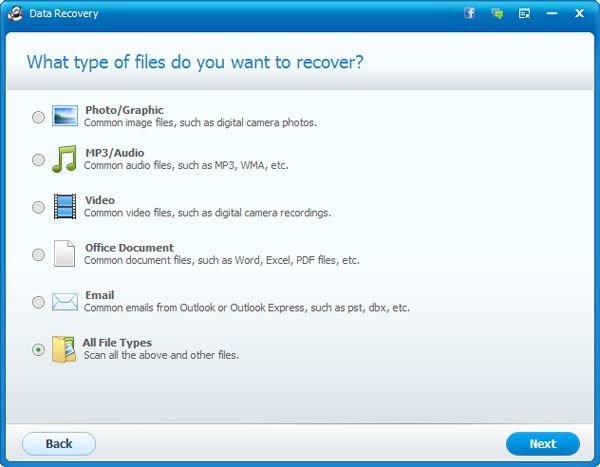
I would like to show you how to recover deleted photos from mobile phone with the comprehensive mobile phone photo data recovery software. Hope they are workable for you. Please note that the guidelines are based on the Windows platform.
![]() Secure Download
Secure Download
![]() Secure Download
Secure Download
Before getting started, I downloaded Firecoresoft Data recovery as per the link provided, then I installed it onto the computer. It took me about two minutes for the installation. After that, I clicked the "run" button and found that the interface of the program was extremely clear and friendly. In the meantime, I connected my Galaxy S4 with the computer.
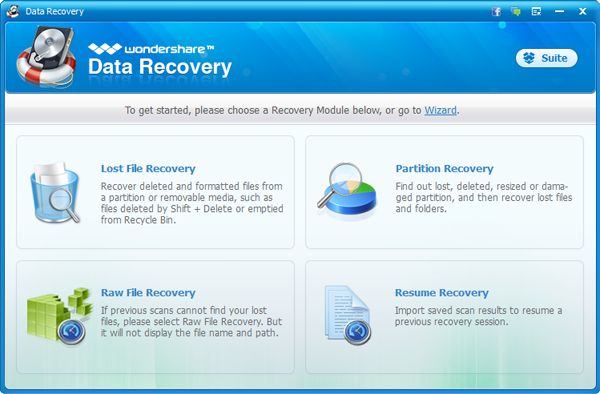
There were four recovery modes in the interface, namely "Lost Data Recovery", "Raw Material Recovery", "iPhone Recovery from iTunes" and "Resume Recovery". There was brief description about each mode for easy reference. Based on my need, I chose the "Lost Data Recovery" mode.
After choosing the recovery mode, I was guided into a new window. There, I could see all existing devices installed on the computer. I browsed and selected my own mobile device. Then, I pressed the "Search" button and the program started scanning immediately. I could view the process on the bar which showed the number of scanned files and the remaining time. By the way, you can pause the scanning if needed. If you need to stop the process for some reasons, you can press the "Save Scan" button to save the results which have been scanned out previously.
About couples of minutes later, the scanning finished. All files such as images, video, document, audio and other items that scanned out were listed on the left panel of the interface. I pressed the "Images" column, and saw that the photos were displayed by the file names. When I clicked one of them, I could see what the image was about.
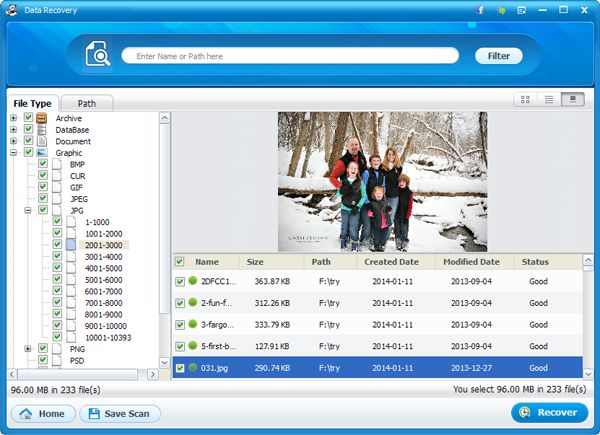
Since I would like to restore all my photos, I chose all of them and then pressed the "Recovery" button on the tool bar. The next moment, a small new window showed up, requiring me to specify the location for saving the recovered photos. So, I created a new file folder on the computer desktop, and clicked "OK". Pretty soon afterwards, the program began the recovery work automatically. I sat on the chair, listening to my favorite songs. After a while, a small window notified me that the job was done. When I opened the folder, I was excited to see a pile of photos! Welcome back, my memories in Hawaii!


Browser compatibility : IE/Firefox/Chrome/Opera/Safari/Maxthon/Netscape
Copyright © 2014 Firecoresoft Studio All Rights Reserved